How to Actually Finish — A Workflow Guide for Pixel Art
How many half-finished pixel art projects are sitting in your account right now? You got the pattern made. The first half hour was fun. Then your hands stopped, and you haven't opened the file in days. Almost everyone who makes pixel art goes through this, and the cause is neither enthusiasm nor talent. It's how the work is structured.
A piece of pixel art may be small as a picture, but as a task it is "several hundred to several thousand repetitions of the same action." That makes it much closer to a marathon, or to a long moving day, than to a sprint. Start it like a sprint and you will run out of fuel partway through. Put it the other way around: if you set up a way of working that survives a long haul, your completion rate goes up dramatically.
This article collects the practical methods for getting all the way to the end once you've already started. Breaking down the reasons projects stall, estimating the workload, splitting the job into small pieces, the order you fill pixels in, designing for interruption and resumption, criteria for escaping perfectionism, and how to decide what "finished" means. The stage where you decide what to draw is covered in Planning Before You Start, so this page focuses only on what happens after your hands are already moving.
1. Why pixel art stalls — four structural causes
Before looking for solutions, let's get an accurate picture of what is actually happening. "I got bored" and "I ran out of time" are results, not causes. Break down the phenomenon of accumulating half-finished work and you generally arrive at four things. Knowing which one applies to you makes everything that follows far more effective.
Cause 1: The workload is invisible
This is the most common one by far. When you open a freshly made pattern, you have no idea how many hours are left. Human persistence collapses when the end of a task is not visible. A task you know will take another 30 minutes and a task of unknown remaining length feel completely different in weight, even when the actual work is identical.
What makes it worse is that invisible workloads get underestimated. You start thinking "I'll finish this today," and two hours later you aren't even halfway. That's the moment the full scale becomes visible, and that's the moment people give up. The breaking point isn't "when you get tired" — it's "when you realize it's farther away than you thought."
Cause 2: The payoff arrives far too late
Pixel art takes a long time to reach the point where it looks like something worth showing. At around 30% completion you still have scattered fragments of color, and even you can barely tell what it's meant to be. In other words, the structure delivers the entire reward in one lump at the very end.
Motivation depends heavily on how often you get a sense of accomplishment. A task that gives you a small win every ten minutes will keep you going far longer in total than one that gives you a win every two hours. The "split it into blocks" method described later is essentially a way to artificially raise the frequency of that reward.
Cause 3: You lose track of where you left off
Opening the file after three days and thinking "where was I?" — that search is the single biggest barrier to resuming. The search produces zero progress while still draining energy. Worse, while hunting around you spot something and think "oh, that part is wrong," which spawns a different task entirely, and thirty minutes later you still haven't placed a single new pixel.
An overlooked point: The cost of resuming grows with the length of the interruption. Resume the next day and your memory is intact; leave it a week and you're rebuilding your understanding from scratch. The longer a project sits, the higher the barrier to reopening it, so it sits longer still — and once you're in that loop, you never open it again. The fix is not "have stronger willpower." It's to stop in a state where resuming requires no thinking.
Cause 4: Perfectionism drags you down into detail
Pixel art tools magnify a single cell so you can work on it. That magnification is essential for placing pixels, but it has a side effect: flaws that are invisible at real size look enormous on the working screen.
The result is spending twenty minutes fiddling with three pixels at a hairline. Those three pixels, viewed at the actual display size once the piece is done, will almost certainly be noticed by nobody — including you. Stack up enough of this "over-investment in the invisible" and your working hours balloon while the overall progress bar stays exactly where it was.
| Symptom | Real cause | Section that addresses it |
|---|---|---|
| You feel heavy before you even begin | The workload is invisible | Section 2 (estimating) |
| An hour in and it feels like nothing moved | Low frequency of accomplishment | Section 3 (block splitting) |
| You reopen the file and close it having done nothing | High cost of resuming | Section 5 (interruption) |
| You keep redoing the same spot | The perfectionism swamp | Section 6 (criteria) |
| Midway through you think of "a better subject" | "Finished" was never defined | Section 8 (definition of done) |
2. Estimate the workload first — you can run when you can see the finish
The countermeasure to Cause 1 is simple: turn the time required into a number before you begin. It does not need to be accurate. Being off by a factor of two is still vastly better than knowing nothing at all. If you know "about three more hours," you can decide "today I'll do one hour."
Estimating from the number of blocks
Block work mode in this tool divides the canvas into 10×10 blocks and shows you one block at a time. That unit doubles perfectly as your unit of estimation. Start by counting total blocks.
- Total blocks = total dots ÷ 100 (round up)
- Total dots is "rows × columns." For example, 1,024 cells is about 11 blocks; 4,096 cells is about 41 blocks.
Then multiply by the time one block takes, applying a coefficient for the number of colors.
Time required (minutes) ≒ total blocks × 7 × color coefficient
| Colors used | Coefficient | Why |
|---|---|---|
| 10 or fewer | about 0.8 | Few color switches, and many chances to place the same color in a run |
| 15–25 | 1.0 (baseline) | The range this tool treats as comfortable to work in; a good balance of judgment and switching |
| 26–40 | about 1.3 | More time spent distinguishing similar colors, so each cell takes longer to decide |
| 41 or more | about 1.6 or higher | Color numbers get misread easily, creating cycles of checking and correcting |
The "7 minutes" figure is a rough guide for filling one 100-cell block. An experienced hand might do it in 5; a first-timer might need 10 or more. Treat this purely as a guide — it varies a great deal between individuals and between subjects. What matters is not precision but knowing the order of magnitude.
Reference table — by canvas size
Rough completion times assuming somewhere in the 15–25 color range. Pieces with a large flat background finish faster than this; pieces patterned edge to edge take longer.
| Approx. total dots | Blocks | Estimated time | Example split |
|---|---|---|---|
| about 250 cells | about 3 | 15–30 min | Doable in one sitting |
| about 1,000 cells | about 11 | 1–2 hours | 3 blocks × 4 sessions |
| about 2,300 cells | about 23 | 2.5–4 hours | 3 blocks × 8 sessions |
| about 4,100 cells | about 41 | 4.5–7 hours | 4 blocks × 10 sessions |
| about 9,200 cells | about 92 | 10–16 hours | 5 blocks × 19 sessions |
Measure your own coefficient: The most trustworthy number is your own. Time yourself finishing just the first block and write down the minutes. Swap that number in for the "7" in the formula above and you have an estimate formula tailored to you. Do this for two or three pieces and you'll simply know, by feel, how many hours a given size takes you — at which point you won't need to calculate at all.
3. Split the job into small pieces — blocks and sessions
Once you have an estimate, the next step is carving out the part you'll do today. "Fill in 4,100 cells" is not a task the human brain can hold. "Four blocks today" is. Same work, but changing how it's sliced lowers the barrier to starting.
Why 10×10 works as a unit
The 100-cell boundary has three psychological advantages.
- One unit of work takes 5–10 minutes. Being short, you can tell yourself "I'll just do one block" and actually start. And once you start, you usually keep going for two or three. Starting is the hard part; continuing isn't.
- Completion is unambiguous. Instead of "I made some progress," you can say "I finished one block." Vague progress doesn't register as accomplishment; binary progress does.
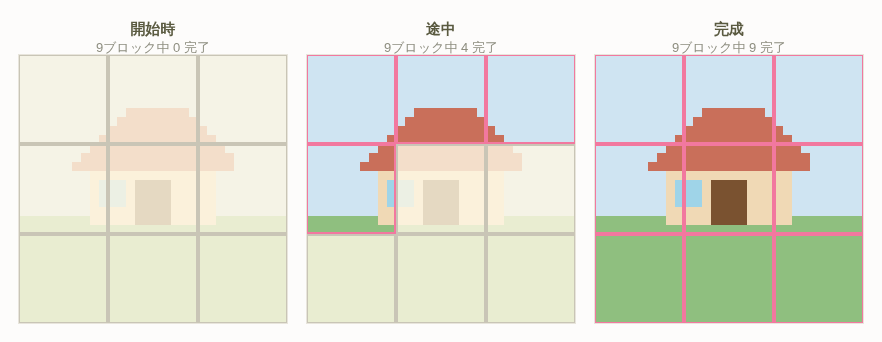
- It's countable. "12 of 41 blocks done" instantly tells you that you're 29% through. When the percentage is visible, the remaining distance becomes concrete.
In this tool's block work mode, each block is shown enlarged and you can tick it off as complete when you're done. That completion state is saved, so the next time you open the piece, "where I left off" is visible at a glance. The pink outlines in the figure above represent blocks that have been checked off.
Decide the size of one session in advance
The other important half of splitting is capping how much you do in one sitting. Without a cap, people work "until they're tired and sick of it." And the next time they open the file, their brain starts from the memory "that was exhausting." Get into the habit of stopping while it's still fun and starting becomes light.
The 15-minute pattern — commutes and coffee breaks
One or two blocks per session. Open it on your phone and target the blocks that are close to a single flat color. The value of this pattern isn't the volume of progress, it's continuity. One block a day is thirty blocks in a month — enough to finish a mid-sized piece outright. This is the pattern for escaping "I can't make anything because I never get a big block of free time."
The 45-minute pattern — the most versatile
Four to six blocks per session. Concentration holds easily and you still feel the progress, which makes this the easiest unit to handle. Zooming out to view the whole piece once midway restores focus for the second half. The trick is deciding your stop time in advance and stopping when it arrives, even mid-block.
The 2-hour pattern — for days you want it done
Ten to fifteen blocks per session. But you must take a five-minute break every 45 minutes. Push through two hours without stopping and accuracy drops during the second hour, which tends to produce the worst possible outcome: spending tomorrow redoing today's work. The longer the session, the more the breaks need to be part of the plan.
Tip: For staying with a project long-term, the single most effective rule is to start each session having decided to do 2–3 blocks and no more. Stopping while you still have energy may feel wasteful. But that leftover "I could have done more" feeling is the fuel for the next time you open the file. Stopping at 70% and coming back tomorrow beats burning out today in total accumulated work.
4. Theories of order — where to start filling in
Where you start filling in affects both your working speed and whether you give up partway. There is no single correct answer; it depends on the piece and on your temperament. Here are three representative orders, compared with their advantages and drawbacks side by side.
Order A: Largest area color first
Place every instance of the most-used color first, then the second, then the third. This tool's normal work mode fills in one color at a time, so it pairs naturally with this order, and the per-color highlight display shows you at a glance where the current color goes.
Advantage: Your progress percentage shoots up early. It's not unusual for the single largest color to cover 30–40% of the piece,
so within the first half hour you have the tangible sense of "30% already done." Color switching is also kept to a minimum.
Drawback: The work in progress stays a "blob of colored regions" for a long time, so it takes a while before it reads as a picture.
Not suited to people who get anxious when they can't see the image forming.
Order B: Background first
Complete the background and ground colors first, then move on to the subject.
Advantage: Backgrounds are usually flat or simply patterned, so your hands move without your head having to work.
It's excellent as a warm-up and makes a good landing spot for "I don't really feel like it but I want to do something" days.
A finished background also lets you see how the subject's colors will actually read,
so you catch color problems before you commit to filling in the subject.
Drawback: All the interesting parts pile up at the end, so the opening is monotonous.
On pieces with a very large background, there's a risk you exhaust yourself on background alone.
Order C: Outlines first
Run the subject's outline and boundary lines all the way around first, then fill the interior afterwards.
Advantage: The piece reaches a "you can tell what it is" state very early, so accomplishment arrives far sooner.
Having the outline in place also makes misalignment obvious while filling the interior.
It prevents the accident of going twenty cells while being one cell off.
Drawback: Outlines are full of curves and each cell needs a real decision, so this is also the order with the hardest opening.
Color switching happens frequently as well.
| Order | Early sense of progress | Time until it reads as a picture | Best suited to |
|---|---|---|---|
| A: Largest area color first | Very fast | Slow | Pieces with many colors / people who manage progress by numbers |
| B: Background first | Fast | Medium | Pieces with simple backgrounds / low-energy days |
| C: Outlines first | Slow | Very fast | Characters and objects / people whose motivation runs out easily |
If you're unsure, the easiest combination to handle is "use C (outlines) to bring out the subject's shape, then switch to A (by area) to fill the rest." You get both the reassurance of the picture appearing early and the speed of progress later on. The same effect works in block work mode: just choose the blocks that contain the subject's outline as your first few.
The order to avoid: The one thing not to do is "whatever catches my eye next." You end up reselecting the same color over and over, inflating your working time by something like 50% in practice. On top of that, your completed areas end up scattered all over the canvas, which makes it impossible to tell by eye which parts are done after an interruption. Any order will do — what matters is that there is an order at all.
5. Build around interruption and resumption
You will almost never get to finish a multi-hour task without a single interruption. Given that, interruption should be built into your plan as a precondition, not treated as an accident. People who interrupt well have visibly higher completion rates than people who don't.
Get full value out of the saved-progress mechanism
In this tool, the completion checks in block work mode are saved as progress. Treat this not as a nice-to-have extra but as the central mechanism for driving the cost of interruption to nearly zero. As long as the checks are there, opening the piece three days later still tells you instantly where to pick up.
Beyond that, you can save your work to your account (this requires logging in). Keeping it only on your device means it can vanish with a new phone or a browser cleanup, whereas an account-saved piece can be continued from a different device. For anything you expect to spend hours filling in, saving is the very first thing to do.
Three habits that make resuming effortless
- Don't stop in the middle of a block. Finish the block, tick the completion check, then stop. Stopping mid-block means hunting with your eyes for "how far into this block did I get," and that hunt burns your motivation. If time is up and only a few cells remain, finish them. If more than half remains, it's ultimately faster to leave the block unchecked and hand the whole thing to next time.
- Decide the next action before you stop. Finish by deciding just "next up: the three blocks in the bottom left." Humans can start a task whose next move is already decided; they cannot start one that begins with deciding the next move. It takes one second, and the effect is enormous.
- Look at the whole piece once right before stopping. Closing the file with the overall image fresh in memory makes reorienting yourself much faster next time. As a bonus, you get to see where in the whole piece today's work actually sat.
Using share URLs: This tool lets you issue a share URL for a piece. It exists for showing work to others, but it also works as a personal "bookmark of progress." Issue a URL at a certain point and paste it into a notes app, and later you'll have a visual record of exactly how far you got that day. The bigger and longer the project, the more this record pays off.
6. Criteria for escaping the perfectionism swamp
Caring about detail is not itself a bad thing. The problem is caring about things in the order you happen to notice them, without any way to tell which details deserve attention and which don't. This section gives you criteria for mechanically deciding whether to fix something.
Criterion 1: If it doesn't bother you zoomed out, don't fix it
This is the most powerful criterion of all. When something bothers you, first drop the magnification and get close to the actual display size. Then check whether it still bothers you. If it doesn't, there is nothing to fix.
Why does this work as a test? Because the piece will ultimately be seen at reduced size. A flaw visible only on the zoomed-in editing screen may as well not exist. The vast majority of one-cell irritations get sorted into "don't fix" by this criterion alone.
Criterion 2: The distance check — three seconds from far away
On a phone, hold it 50–70 cm away and squint. Those two moves are the whole test. What you can see in that state is only the arrangement of color masses and the differences in light and dark.
- Problems visible at this distance (worth fixing): the subject and background have similar brightness and are melting together, the silhouette has broken down, the color balance is skewed to one side, a large area of color is jumping out.
- Problems invisible at this distance (don't fix): a one-cell jag in an outline, the flow of a single strand of hair, a shadow boundary that's off by one cell, small patterns that aren't perfectly symmetrical.
The crucial point is that problems found by the distance check cannot be solved by fixing detail. If the subject is melting into the background, what you need is not smoother outlines but a change to the brightness of the background or the subject. Identify which layer the problem lives on before you start moving your hands.
Criterion 3: Let time pass
Your eyes immediately after a work session are the least trustworthy judge of that piece. The afterimage of having stared at detail leaves you seeing nothing but flaws. Review it after a night's sleep and your judgment often changes completely. "I can't even find the spot that bothered me so much yesterday" is an extremely common experience.
Conversely, if something still jumps out at you after a night away, that's a real problem. Fix only that, and the perceived quality of the piece rises sharply. Letting time pass is, in effect, a mechanism that automatically filters which things deserve fixing.
| What's bothering you | Verdict | What to do |
|---|---|---|
| Only bothers you at high magnification | Don't fix | Move on to the next block |
| Still bothers you zoomed out, but you can't say why | Hold | Sleep on it and judge again |
| The subject's shape doesn't read from a distance | Fix | Change brightness contrast or area. Don't touch detail |
| You've redone the same spot three or more times | Stop | Move to a different block for the day |
| You decided to fix it but can't think how | Defer | Finish everything else, then look at it last |
Set a time budget: If detail genuinely gets to you, it helps to decide up front that "revisions get at most 10% of the total time." On a four-hour piece, that's 24 minutes. Once the budget is spent, the remaining irritations get carried forward as goals for the next piece. Finishing one more piece will improve your next one more reliably than perfecting this one.
7. Designing motivation — don't rely on willpower
Motivation isn't something you leave to chance; it's something you can manufacture through how you structure the work. Some of this overlaps with earlier sections, but here are the techniques specifically aimed at continuing.
Do the most enjoyable part first
Before you start, ask yourself which part of this piece you most want to fill in. Maybe it's the character's face, maybe it's a pattern you're proud of. Do that part in your first session, or by your second at the latest.
Saving the fun part "as a reward for the end" seems sensible but backfires, because you run out of energy before reaching the reward. Do the fun part first and, the moment it's complete, your desire to finish this specific piece grows much stronger. People have a strong tendency to be reluctant to abandon something they've already invested in. Put that on your side.
Should you show work in progress?
This one works in opposite directions depending on the person, so it's useful to know which type you are.
- The type that moves faster after sharing: "I've shown it, so I'd better finish it" kicks in. This suits people who are good at manufacturing external deadlines. If that's you, issuing a share URL and sending the work in progress to someone is genuinely effective.
- The type that stalls after sharing: The moment you get a reaction to work in progress, the sense of accomplishment arrives early and the motive to finish evaporates. If this rings true, not showing anyone until it's done is the safer bet.
If you can't tell which you are, try one piece with a no-sharing policy first. If you can finish without showing it, that becomes your standard way of working. Finished pieces can also be posted to the community gallery (public works appear after review by the site administrator).
Start with something small
If you currently have three or more half-finished pieces, set them aside and finish one piece that takes under an hour. Around 300 cells, ten colors or fewer, a simple subject — that's fine.
The goal isn't to make something good; it's to create one experience of having finished. Tackling a large piece with no completion experience is like signing up for a 100 km race without ever having run a marathon. Finish three small pieces and you simultaneously acquire a sense of pace, your own estimation coefficient, and the feeling of "oh, so that's all finishing is." Go back to the large piece after that and it moves completely differently.
Keep a record: Save your finished pieces to your account and the list itself becomes the record. During a stretch when you have lots of unfinished work, it feels like you're doing nothing; looking at a list of completed pieces lets you actually see that things have been accumulating. That makes starting the next one lighter.
8. Decide what "finished" means before you start
Last comes the point that is most often overlooked and most effective: deciding, before you begin, what condition counts as finished.
Without a definition of done, a piece never ends. Even after all the filling in is complete, "I feel like I could make it a bit better" keeps going, and eventually you think of a different idea and move on to that instead. This is the final cause of accumulating unfinished work.
How to write a completion condition
Write the condition in a form someone other than you could evaluate. "Finished when I'm satisfied" can't be evaluated, so it isn't a condition. Write it like this instead:
- "Finished when every block has a completion check." — The simplest and the strongest condition.
- "Finished when you can tell what it is within one second at arm's length." — A condition based on how it reads.
- "After the fill-in is done, revisions get 30 minutes. When time is up, it's finished." — A condition based on time.
- "Finished when the subject's outline, shading and background are all in place. No additional detail." — A condition based on elements.
Any one of them will do. Note it down before you start, and when the condition is met, declare the piece finished even if things still bother you. Write those things down as "for the next piece" and nothing is wasted.
Don't change the condition midway: You will inevitably think "actually, let me add detail here too" while working. Rewrite the completion condition every time that happens and the finish line keeps receding. Don't act on those ideas — write them down and carry them to the next piece. Preventing the scope from expanding partway through is a fundamental of every kind of creative work.
Summary — seven actions that raise your completion rate
Here is everything in this article reduced to things you actually do.
- Count the total blocks before starting and estimate the time (a rough guide is fine)
- Cap the number of blocks per session (2–3 if you're unsure)
- Pick one order for filling in (outlines then by area is the easiest combination)
- Never stop mid-block; tick the completion check, then close
- Decide your next action in one sentence before stopping
- Always zoom out and look before deciding whether to fix something
- Write one completion condition before you start, and don't change it
None of this requires special skill. You don't need all seven either — starting with the two or three that match the reason you personally stall is plenty. In pixel art, it isn't that good artists finish things; it's that the people who finish things become good. Start by opening one of your unfinished pieces and counting the blocks that remain. The moment you count them, that piece turns into a task with a visible end.